Wailing Caverns
- Level
- 17-24
- Zone
- The Barrens
- Duration
- ~45 min
- Updated
- Oct 9, 2026
Overview
Wailing Caverns (WC) is a fairly large dungeon in The Barrens, near the Crossroads. Being so big, it is easy to get lost if you do not know it: the path winds around a lot and the bosses are spread across the different wings. Luckily the bosses are simple.
- Faction: Both
- Location: southwest of the Crossroads, The Barrens
- Difficulty: Medium (simple fights, maze)
Group composition
Any tank works at this level; a Warrior or a Druid in Bear Form is the safest, and a shield tank makes Verdan much easier.
If you are short on levels, a class that can do crowd control (CC) will help.
How to get there
Horde: Run southwest from the Crossroads to the oasis; the entrance is on the north side of the oasis. There is a previous cave before you can access the dungeon.
Alliance:
-
from Darnassus: Go down from Darkshore to the south, cross Ashenvale completely and exit through the south to reach the north of The Barrens; from there, continue to the oasis.
-
from the Wetlands: Take the boat to Ratchet from the Wetlands, continue to the oasis.
The Barrens
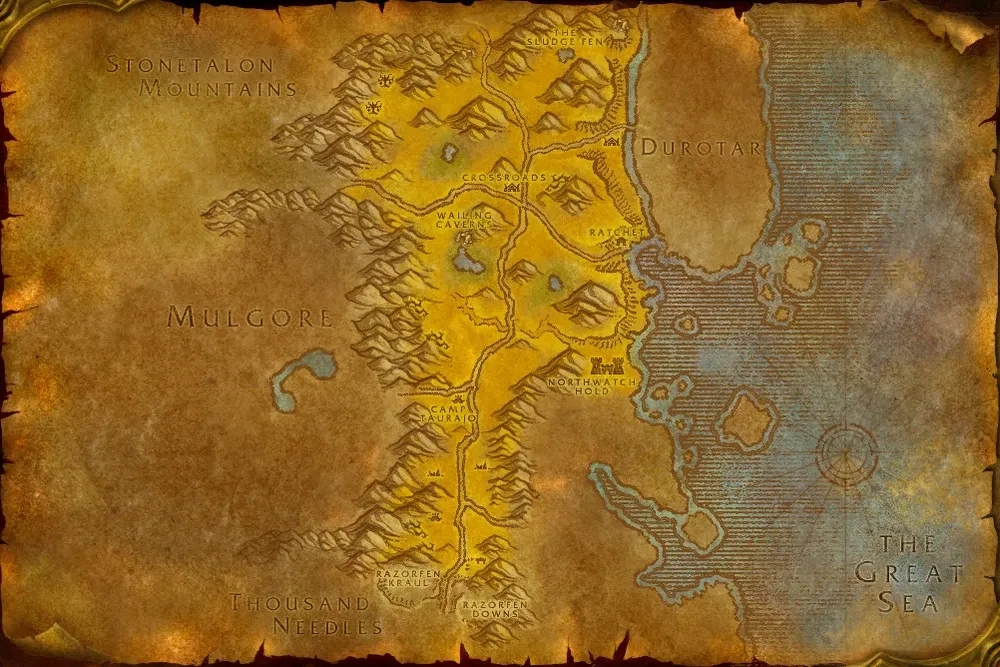 EWailing CavernsANorth accessBRatchet access
- EWailing Caverns
- ANorth access
- BRatchet access
- AArrival from Darnassus - Darkshore - Ashenvale
- BArrival from the Wetlands
Cave entrance
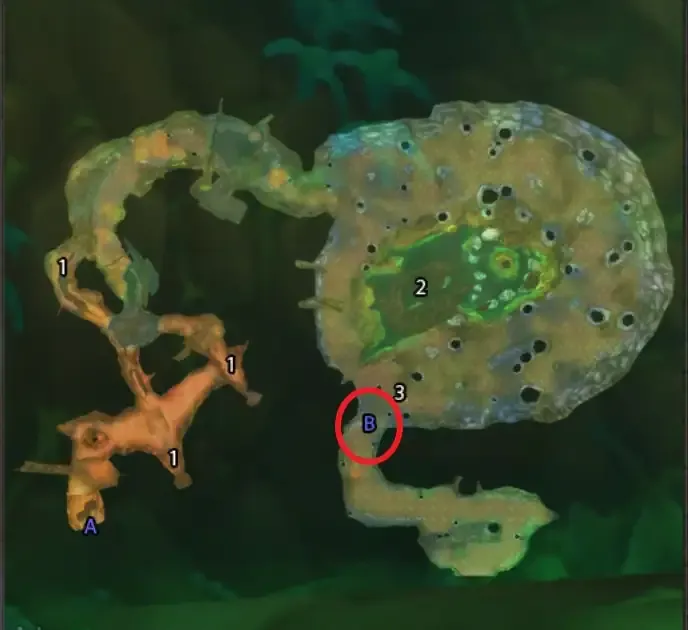 EInstance portalOExit to the oasis
- EInstance portal
- OExit to the oasis
Route
Route 1
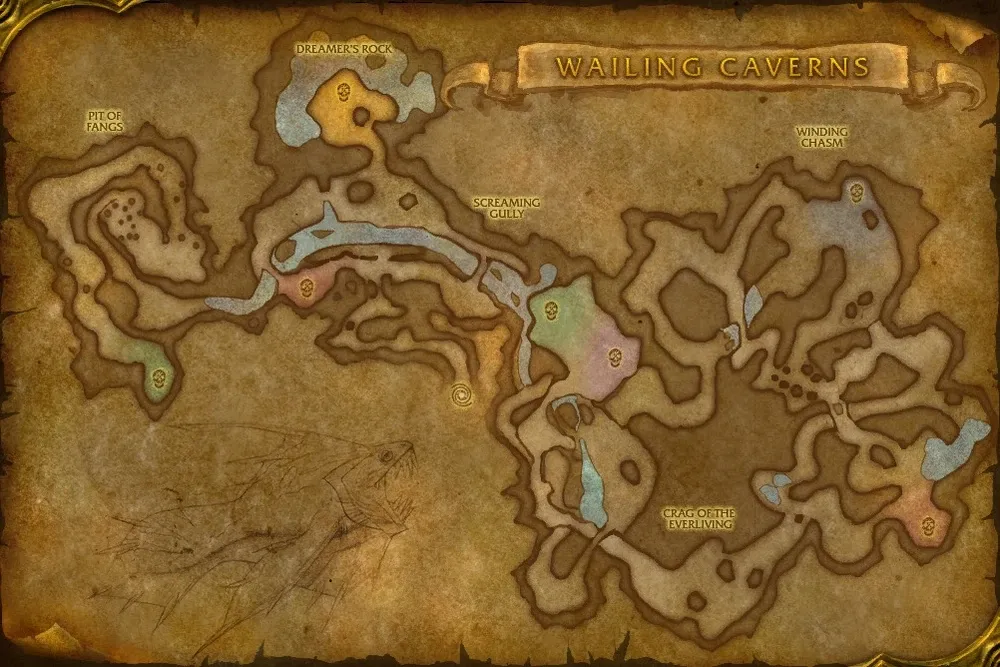 E1Lady Anacondra2Lord Cobrahn3Kresh4Lord Pythas5Skum6Deviate Faerie Dragon7Lord Serpentis8Verdan the Everliving9Mutanus the Devourer
- First Run
- 1Lady Anacondra
- Jump down
- 2Lord Cobrahn
- Jump down
- 3Kresh
- 4Lord Pythas
- 5Skum
- 6Deviate Faerie Dragon
- Dangerous jump
- 7Lord Serpentis
- 8Verdan the Everliving
- Jump down
- Naralex escort
- 9Mutanus the Devourer
In this dungeon, once the four Fanglords are dead, you have to return to the entrance to activate Naralex's escort and trigger the last boss. At the start, from the entrance you go west for Lady Anacondra, and from there you can follow the route towards the west wing of the dungeon.
- EYou start in the initial area of the cave. Apply the buffs and agree on crowd control and marks before the first pull: a wipe here is a long walk back.
- 1Lady Anacondra: First Fanglord. She casts Lightning Bolt and Sleep, and patrols can wander into the pull. Control the adds and kill her first.
- After killing Lady Anacondra you have to jump into the river towards the west wing.
- 2Lord Cobrahn: At the end of the west corridor with three Deviate Pythons. Kill the pythons and then focus the boss: he hits much harder in serpent form.
- After killing Lord Cobrahn jump down to return to the river.
- 3Kresh: Optional non-hostile turtle that patrols the river. High armor, no abilities: pull him out of the water and use armor-reducing attacks.
- 4Lord Pythas: Sits at a patrolled intersection, so you often pull extra mobs. CC the extras, interrupt the Sleep and keep melee out of his Thunderclap.
- 5Skum: Easy tank-and-spank. His Chained Bolt arcs between nearby players, so keep the melee spread and tank him away from the group.
- 6Deviate Faerie Dragon: It is a rare spawn, so it is not always up. Kill the Druid of the Fang that accompanies it first and interrupt its Sleep.
- You have to jump, but time it well so you do not fall short.
- 7Lord Serpentis: Leader of the Druids of the Fang. Only the shared druid kit plus a heavy melee hit: keep him interrupted and pull him alone if you can.
- 8Verdan: Optional but on the route, and the hardest fight for the healer. His Grasping Vines root and knock everyone within 10 yards: keep the group at range and use a defensive cooldown.
- After killing Verdan you have to jump down to return to the river.
- The Disciple only appears once all four Fanglords are dead. Escort him to Naralex's chamber and keep every add off him.
- 9Mutanus the Devourer: Summoned after the Naralex escort. Kill the two add waves while keeping them off the Disciple, then tank Mutanus away from the group so Thundercrack only hits you.
- #mazeMaze
This dungeon is a maze.
Wailing Caverns is a maze, so try to follow Route 1 and keep the correct order of the bosses. If you do that I do not think you will have many problems.
- #escortGroup management
Do not skip the Naralex escort.
After the four Fanglords die, return to the entrance and talk to the Disciple of Naralex. The escort and Mutanus are optional, but they are the whole point of the run and where the best loot is. Route 1 covers it.
- Keep every add off the Disciple — if he dies, the event is over.
- #optionalBosses
Kresh, Verdan and the Faerie Dragon are optional.
Kresh is a non-hostile turtle in the river, Verdan is the hardest fight in the dungeon, and the Deviate Faerie Dragon is a rare spawn in the east part of the cave. Route 1 marks all three so you can decide on the spot.
Tank tips
Interrupts
Interrupt the Druids of the Fang.
They open with Lightning Bolt, shapeshift into cobras and heal when they are low; they also use Sleep on a group member. Try to interrupt them whenever you can.
Positioning
Keep the group out of Verdan's melee.
Verdan's Grasping Vines root and knock everyone within 10 yards, and he hits very hard for this level. Only the tank needs to be close: everyone else should stay at range and let the healer focus on you.
Mutanus
Protect the Disciple during the Naralex event.
Keep every add off the Disciple of Naralex and taunt any that slip away: if he dies, the dungeon ends. Try to pick up all the adds that spawn, although some may escape you since there are many. Mutanus arrives on the third wave, so save a defensive cooldown for him and pick him up fast. It is a fairly long boss fight and can be a wipe if it is not done well.
Bosses
Lady Anacondra(opens on Wowhead in a new tab)
Strategy: Usually the first boss. She is a druid, so she can Lightning Bolt and put a group member to Sleep. The real danger is the patrol you may pull with her: control the adds and burn Anacondra first.
Abilities
- Lightning Bolt: Ranged nature damage; interrupt her casts if you can.
- Sleep: Puts a group member to sleep; a priest dispel or a shaman Tremor Totem breaks it.
- Healing Touch: Heals her when low; interrupt it to stop the fight dragging on.
Tank notes: Pull her away from the wandering patrols and hold threat while the group kills her. Face her away from the group and be ready to pick up any add that gets body-pulled.
Kresh(opens on Wowhead in a new tab)
Strategy: An optional non-hostile turtle that patrols the river. He has no real abilities, just very high armor, so he is a straight tank-and-spank if the group wants his shield.
Tank notes: Optional. Pull him out of the water so the group is not fighting while swimming, and use armor-reducing attacks (Sunder Armor) to speed it up.
Lord Cobrahn(opens on Wowhead in a new tab)
Strategy: At the end of a long corridor on the west side. He always comes with three Deviate Pythons; they are not elite and die to cleave. Kill the adds, then focus the boss.
Abilities
- Lightning Bolt: Ranged nature damage; interrupt it when you can.
- Sleep: Puts a group member to sleep; a priest dispel or a shaman Tremor Totem breaks it.
- Serpent Form: Transforms into a serpent, increasing his damage and attack speed.
Tank notes: Face him away from the group. When he shifts into serpent form he hits much harder and faster — pop a defensive cooldown and warn the healer.
Lord Pythas(opens on Wowhead in a new tab)
Strategy: Sits at an intersection where Druids of the Fang and Deviate Shamblers patrol, so you often pull extra mobs. Control the extras, interrupt his Sleep, and keep melee out of his Thunderclap.
Abilities
- Sleep: Puts a group member to sleep; a priest dispel or a shaman Tremor Totem breaks it.
- Thunderclap: Hits everyone in melee range; ranged and casters should stay out of it.
Tank notes: Expect to pull him with one or two extra mobs; CC them and kill them first. Keep him facing away and hold threat through the adds' heals.
Deviate Faerie Dragon(opens on Wowhead in a new tab)
Strategy: Optional rare spawn in the east part of the cave. He has no notable abilities, but he appears in a busy corridor, so you usually pull a Druid of the Fang with him.
Tank notes: Rare. If he is up, kill the Druids of the Fang first and interrupt their Sleep, then let the group burn the dragon. Skip him if the group is struggling.
Skum(opens on Wowhead in a new tab)
Strategy: A simple tank-and-spank thunder lizard. His only ability is a Chained Bolt that jumps between anyone standing too close, so the group should spread out.
Abilities
- Chained Bolt: Arcs between nearby players; stay spread, especially if you have several melee.
Tank notes: Tank him away from the group and keep yourself spaced from the melee so the bolt does not chain. Easy fight.
Lord Serpentis(opens on Wowhead in a new tab)
Strategy: Leader of the Druids of the Fang. He only has the shared druid kit plus a heavy melee hit, so keep him interrupted and it is a straightforward fight.
Abilities
- Lightning Bolt: Ranged nature damage; interrupt it when you can.
- Sleep: Puts a group member to sleep; a priest dispel or a shaman Tremor Totem breaks it.
- Healing Touch: Heals him when low; interrupt it.
Tank notes: Keep interrupts on his heal and Sleep, and pull him alone if you can — he hits harder than the other fanglords.
Verdan the Everliving(opens on Wowhead in a new tab)
Strategy: Optional but on the route, and the hardest fight for the healer. His Grasping Vines root and knock everyone within 10 yards, so anyone who does not need to be in melee should stay at range. He hits very hard for this level.
Abilities
- Grasping Vines: Roots and knocks back everyone within 10 yards; stay out of melee if you can.
Tank notes: Do not let the group stand near him. Use defensive cooldowns and a shield tank if you have one — he hits for roughly 300 per swing even at this level. Keep threat and let the healer focus on you.
Mutanus the Devourer(opens on Wowhead in a new tab)
Strategy: Summoned at the end of the Naralex event. Two waves of adds come first (easy to AoE down), then Mutanus on the third wave. He fears (Terrify), sleeps (Naralex's Nightmare) and deals area damage around him (Thundercrack).
Abilities
- Terrify: Area fear; it can send the group running into untouched packs.
- Naralex's Nightmare: Puts a target to sleep; a dispel or Tremor Totem breaks it.
- Thundercrack: Area damage around him; ranged players should stay out of melee range.
Tank notes: Tank him away from the group so Thundercrack only hits you. Watch the Disciple's health during the waves and taunt any add that goes for him. Pop a defensive cooldown and keep Mutanus faced away.
Quests
Deviate Hides(opens on Wowhead in a new tab)
- Quest giver:
- Nalpak(opens on Wowhead in a new tab)
- Starts in:
- The Barrens (cave above the entrance)
Objective: Collect Deviate Hides from the deviate creatures in and around the caverns and bring them to Nalpak.
Deviate Eradication(opens on Wowhead in a new tab)
- Quest giver:
- Ebru(opens on Wowhead in a new tab)
- Starts in:
- The Barrens (cave above the entrance)
Objective: Kill the deviate creatures the quest asks for and return to Ebru.
Serpentbloom(opens on Wowhead in a new tab)
- Quest giver:
- Apothecary Zamah(opens on Wowhead in a new tab)
- Starts in:
- Thunder Bluff (Pools of Vision)
Objective: Gather Serpentbloom from the floor of the caverns and bring it to Apothecary Zamah.
Trouble at the Docks(opens on Wowhead in a new tab)
- Starts in:
- The Barrens (Ratchet)
Objective: Find the invisible goblin Mad Magglish in the non-instanced part of the cave and take his bottle.
Smart Drinks(opens on Wowhead in a new tab)
- Quest giver:
- Mebok Mizzyrix(opens on Wowhead in a new tab)
- Starts in:
- The Barrens (Ratchet)
Objective: Collect the essence dropped by the ectoplasms in and around the caverns and bring it to Mebok Mizzyrix.
Leaders of the Fang(opens on Wowhead in a new tab)
- Quest giver:
- Nara Wildmane(opens on Wowhead in a new tab)
- Starts in:
- Thunder Bluff (Elder Rise)
Objective: Slay the four Fanglords — Lady Anacondra, Lord Cobrahn, Lord Pythas and Lord Serpentis — and bring their gems to Nara Wildmane.
Waking Naralex(opens on Wowhead in a new tab)
- Starts in:
- Wailing Caverns
Objective: Once all four Fanglords are dead, escort the Disciple of Naralex to Naralex's chamber and defend him until Naralex wakes.
The Glowing Shard(opens on Wowhead in a new tab)
- Starts in:
- Wailing Caverns
Objective: Loot the Glowing Shard from Mutanus the Devourer; it starts a quest that leads back out of the caverns.