Ragefire Chasm
- Level
- 13-18
- Zone
- Orgrimmar
- Duration
- ~30 min
- Updated
- Oct 9, 2026
Overview
Ragefire Chasm (RFC) is the easiest dungeon in the game and a great first tanking experience. It sits deep beneath Orgrimmar and is only available to Horde players. Expect a linear path, simple pulls, and a handful of low-level bosses — perfect for learning the basics of threat, positioning, and interrupts.
- Faction: Horde only
- Location: Cleft of Shadow, Orgrimmar
- Difficulty: Very easy (linear, elementary mechanics)
Group composition
A Warrior is the safest first tank, but a Druid in Bear Form or a Shaman with a shield can also tank RFC at this level. Druid, Priest, and Shaman can all heal, and a Mage is always handy for Polymorph on the many trogg packs.
How to get there
Horde — Head to the Cleft of Shadow in Orgrimmar and look for the instance portal.
Alliance — RFC is deep in Horde territory, so getting in is the real challenge. Take the boat to Ratchet, run to the northeastern tip of The Barrens, and use the less-populated west entrance of Orgrimmar. From there it is a corpse run into the Cleft of Shadow until you can safely zone into the instance.
Orgrimmar
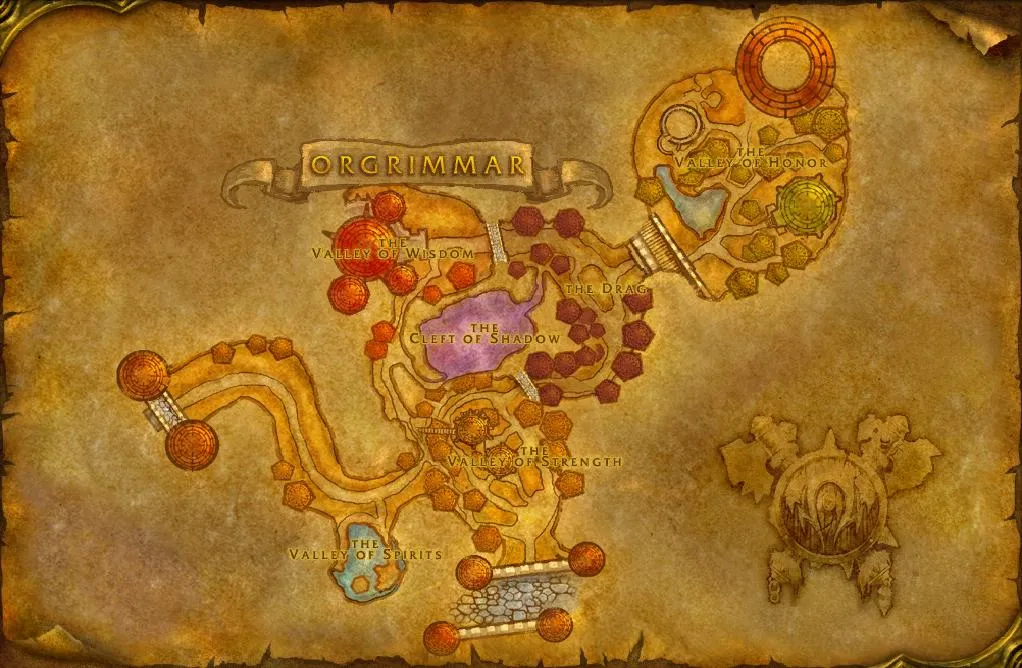 ERagefire Chasm Entrance
- ERagefire Chasm Entrance
The Barrens
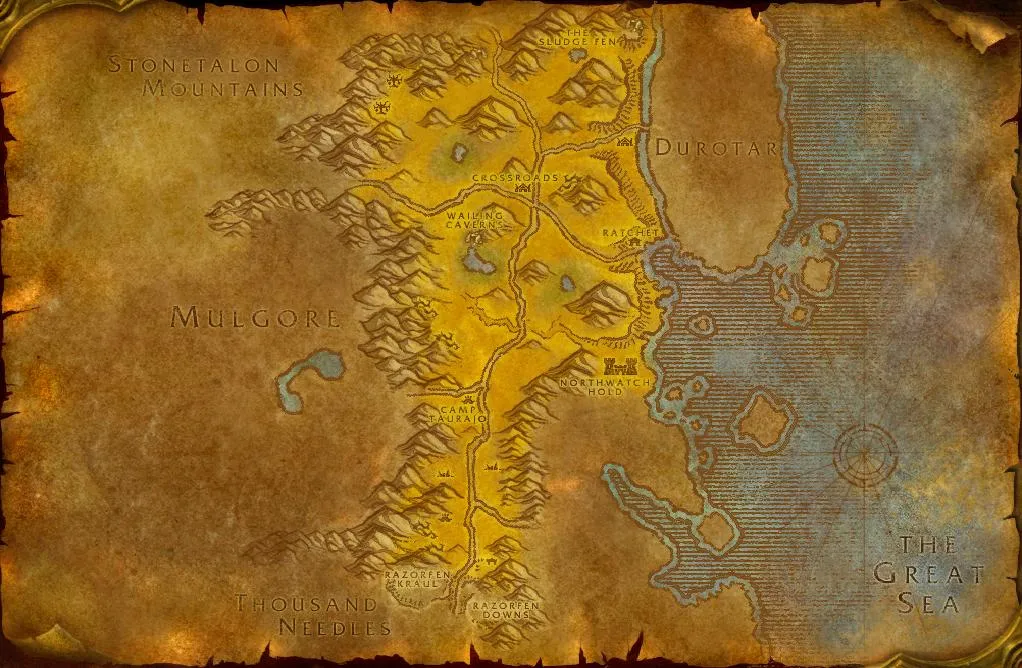 XSide Entrance Orgrimmar
- XSide Entrance Orgrimmar
Route
Route 1
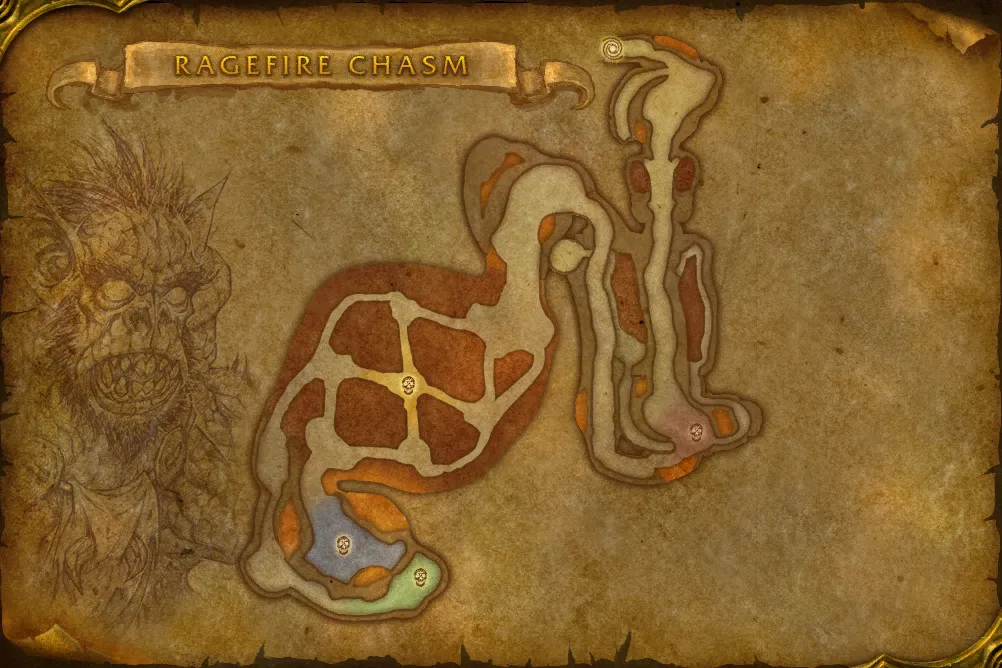 E1Oggleflint2Taragaman the Hungerer3Bazzalan4Jergosh the InvokerAMaur Grimtotem
- 1Oggleflint
- 2Taragaman the Hungerer
- 3Bazzalan
- Jump Down
- 4Jergosh the Invoker
- AMaur Grimtotem
The safe, standard route through Ragefire Chasm. Clear each pack fully before moving on, keep the troggs crowd-controlled where you can, and watch your footing near the lava — a knockback into the pit is usually a wipe. This is the recommended route for first timers. It front-loads the optional quest NPCs and leaves the hardest boss, Jergosh, for last. Give the healer time to drink before pulling him.
- ESingle pack right at the door. Buff up here — it is a long run back from the graveyard if you wipe.
- 1Two troggs flank him. CC one, pull the other away, and face Oggleflint toward the wall so his Cleave never reaches the group.
- 2Tank him in the middle of the platform so Uppercut does not send you into the lava. Ranged should stand at max range for Fire Nova; otherwise it is a straight tank-and-spank.
- 3Has two adds; the one on his left can be pulled without the boss. CC the other, burn Bazzalan fast — he hits hard single-target.
- After Bazzalan, drop down here to cut back toward the last boss. Only jump once the whole group is ready — there is no way back up.
- 4The hardest fight on the route. Interrupt his casts and keep threat high — Curse of Weakness wrecks your threat generation.
- AQuest NPC for the lost satchel chain. Talk to him before you pull the pack next to him.
Route 2
E1Oggleflint2Taragaman the Hungerer3Jergosh the Invoker4BazzalanAMaur Grimtotem- 1Oggleflint
- 2Taragaman the Hungerer
- 3Jergosh the Invoker
- Jump onto the low ledge and follow it up
- 4Bazzalan
- AMaur Grimtotem
The quicker route through Ragefire Chasm. After Taragaman it cuts straight to Jergosh and then jumps onto the low ledge up to Bazzalan, leaving him as the last boss and shaving a few pulls off the clear. Pick this one when you want a faster clear without skipping any boss — the ledge shortcut from Jergosh's platform is the whole point of the variant.
- ESingle pack right at the door. Buff up here — it is a long run back from the graveyard if you wipe.
- 1Two troggs flank him. CC one, pull the other away, and face Oggleflint toward the wall so his Cleave never reaches the group.
- 2Tank him in the middle of the platform so Uppercut does not send you into the lava. Ranged should stand at max range for Fire Nova; otherwise a straight tank-and-spank.
- 3Interrupt his casts and keep threat high — Curse of Weakness wrecks your threat generation and Immolate taxes the healer.
- After Jergosh, turn south and jump onto the low ledge, then follow it up and around the corner to Bazzalan. This shortcut skips a few pulls.
- 4Has two adds; the one on his left can be pulled without the boss. CC the other and burn Bazzalan fast — he hits hard single-target.
- AQuest NPC for the lost satchel chain. Talk to him before you pull the pack next to him.
Route 3
E1Oggleflint2Bazzalan3Jergosh the Invoker4Taragaman the HungererAMaur Grimtotem- 1Oggleflint
- 2Bazzalan
- Jump Down
- 3Jergosh the Invoker
- 4Taragaman the Hungerer
- AMaur Grimtotem
The anti-bail route. After Oggleflint it skirts the north and west walls to Bazzalan, drops down to Jergosh and only then goes back for Taragaman, so he dies last. Taragaman is the boss people tend to leave after, so saving him for the end means everyone has to finish the whole dungeon first. It costs a few extra pulls compared to Route 2.
- ESingle pack right at the door. Buff up here — it is a long run back from the graveyard if you wipe.
- 1Two troggs flank him. CC one, pull the other away, and face Oggleflint toward the wall so his Cleave never reaches the group.
- 2Has two adds; the one on his left can be pulled without the boss. CC the other, burn Bazzalan fast — he hits hard single-target.
- After Bazzalan, drop down here to reach Jergosh. Only jump once the whole group is ready — there is no way back up.
- 3Interrupt his casts and keep threat high — Curse of Weakness wrecks your threat generation and Immolate taxes the healer.
- 4Last on purpose. Tank him in the middle of the platform so Uppercut does not send you into the lava, and keep ranged at max range for Fire Nova.
- AQuest NPC for the lost satchel chain. Talk to him before you pull the pack next to him.
- #alliance-questsFaction
Alliance players have no quests in RFC.
Loot and experience are the only incentives to run it as Alliance — there are no quest rewards to chase.
- #group-bailGroup management
Taragaman is where players bail.
Killing him finishes the Slaying the Beast quest, and it is common for party members to leave right after. Save him for last: Route 3 takes Bazzalan and Jergosh first and only then goes back for Taragaman.
- Forces impatient players to finish every boss before abandoning the party.
Tank tips
First time
This may be your very first dungeon.
If you are a Horde tank, Ragefire Chasm is probably the first dungeon you will ever run, and that makes it harder than it looks: pulling, holding aggro, positioning and talents are all new at once. It is normal to struggle here.
Group management
Tell the group you are new.
Say it at the start: it is your first time tanking and you would like to go slowly. Most players respect that. If someone does not, you are not obliged to put up with it.
Preparation
Agree on CC and marks before the first pull.
Ask who has crowd control and mark your targets. Almost every boss here depends on someone controlling an add.
Positioning
Pull casters out of line of sight.
Use corners and walls so enemy casters have to come to you, which also groups the pack. Always leave enemies facing away from the group.
Preparation
Know your talents and your aggro tools.
Check your talent build and your threat abilities before you enter. A class resources section is coming to this site soon.
Bosses
Oggleflint(opens on Wowhead in a new tab)
Strategy: Control one of the two trogg adds, kill the other first, then focus Oggleflint.
Abilities
- Cleave: A frontal attack; keep it facing away from the group.
Tank notes: Flanked by 2 troggs. CC at least one add, face Oggleflint away from the group, and kill the adds before the boss.
Taragaman the Hungerer(opens on Wowhead in a new tab)
Strategy: A straightforward boss fight with no adds. Keep the group on the middle platform and have ranged players stay at maximum range for Fire Nova.
Abilities
- Fire Nova: A fire attack that is less of a threat to ranged players at maximum range.
- Uppercut: Knocks back the tank; being near the edge can send you into the lava.
Tank notes: Tank him in the middle of the platform, away from the edges so Uppercut does not knock you into the lava. Ranged should stay at max range for Fire Nova. Otherwise a simple tank-and-spank.
Jergosh the Invoker(opens on Wowhead in a new tab)
Strategy: Crowd-control one of his two adds and kill the other before switching to Jergosh. Interrupt Immolate when possible to reduce pressure on the healer.
Abilities
- Curse of Weakness: Weakens the tank and makes it harder to maintain threat.
- Immolate: Deals fire damage over time; interrupt it when possible to spare healer mana.
Tank notes: Curse of Weakness hurts threat generation. Keep threat up and use an available interrupt on Immolate.
Bazzalan(opens on Wowhead in a new tab)
Strategy: Crowd-control one add and focus Bazzalan rather than letting the fight drag on; he deals significant single-target damage.
Abilities
- Sinister Strike: A direct melee strike that contributes to his high single-target damage.
- Deadly Poison: Poisons his target; a poison dispel can help the healer manage incoming damage.
Tank notes: Has 2 adds; the one on the right (his left) can be pulled without pulling the boss. CC the other add and focus Bazzalan fast — he hits hard single-target.
Quests
Testing an Enemy's Strength(opens on Wowhead in a new tab)
- Quest giver:
- Rahauro(opens on Wowhead in a new tab)
- Starts in:
- Thunder Bluff (Spirit Rise)
Objective: Kill 8 Ragefire Troggs and 8 Ragefire Shamans inside RFC, then return to Rahauro.
Searching for the Lost Satchel(opens on Wowhead in a new tab)
- Quest giver:
- Rahauro(opens on Wowhead in a new tab)
- Starts in:
- Thunder Bluff (Spirit Rise)
Objective: Deliver the satchel to Maur Grimtotem (found dead) inside RFC.
Returning the Lost Satchel(opens on Wowhead in a new tab)
- Quest giver:
- Maur Grimtotem(opens on Wowhead in a new tab)
Objective: Return the satchel to Rahauro in Thunder Bluff.
Hidden Enemies(opens on Wowhead in a new tab)
- Quest giver:
- Thrall(opens on Wowhead in a new tab)
- Starts in:
- Orgrimmar (Grommash Hold)
Objective: 3-part chain; the final step requires defeating Bazzalan and Jergosh the Invoker.
Slaying the Beast(opens on Wowhead in a new tab)
- Quest giver:
- Neeru Fireblade(opens on Wowhead in a new tab)
- Starts in:
- Orgrimmar (Cleft of Shadow)
Objective: Slay Taragaman the Hungerer.
The Power to Destroy(opens on Wowhead in a new tab)
- Quest giver:
- Varimathras(opens on Wowhead in a new tab)
- Starts in:
- Undercity (Royal Quarter)
Objective: Complete the objective inside RFC and return to Varimathras.